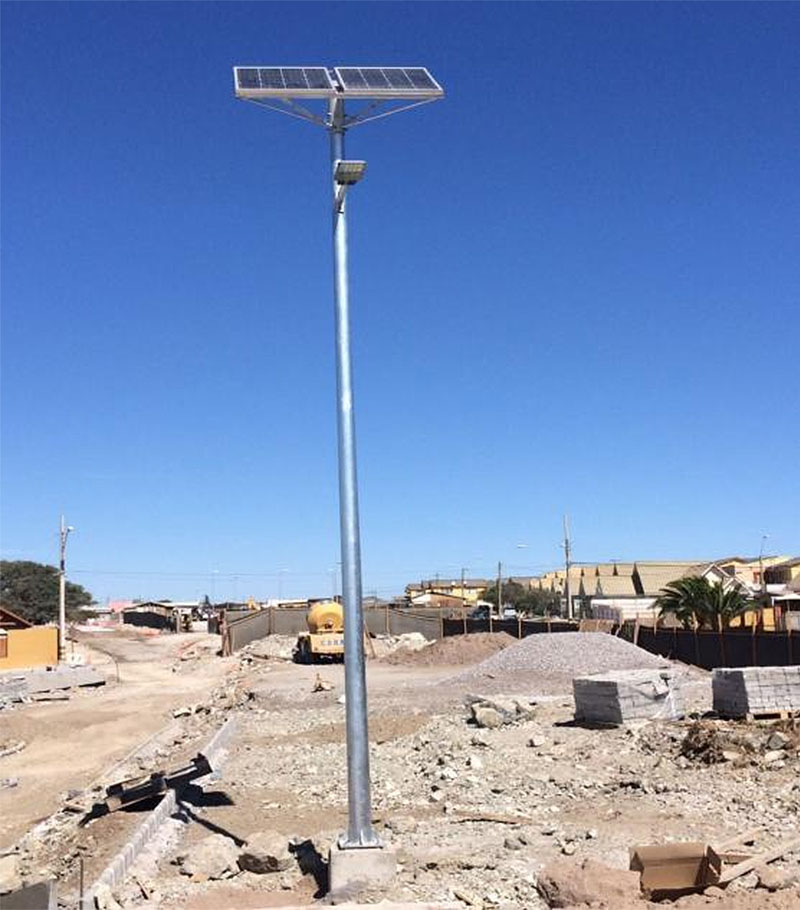
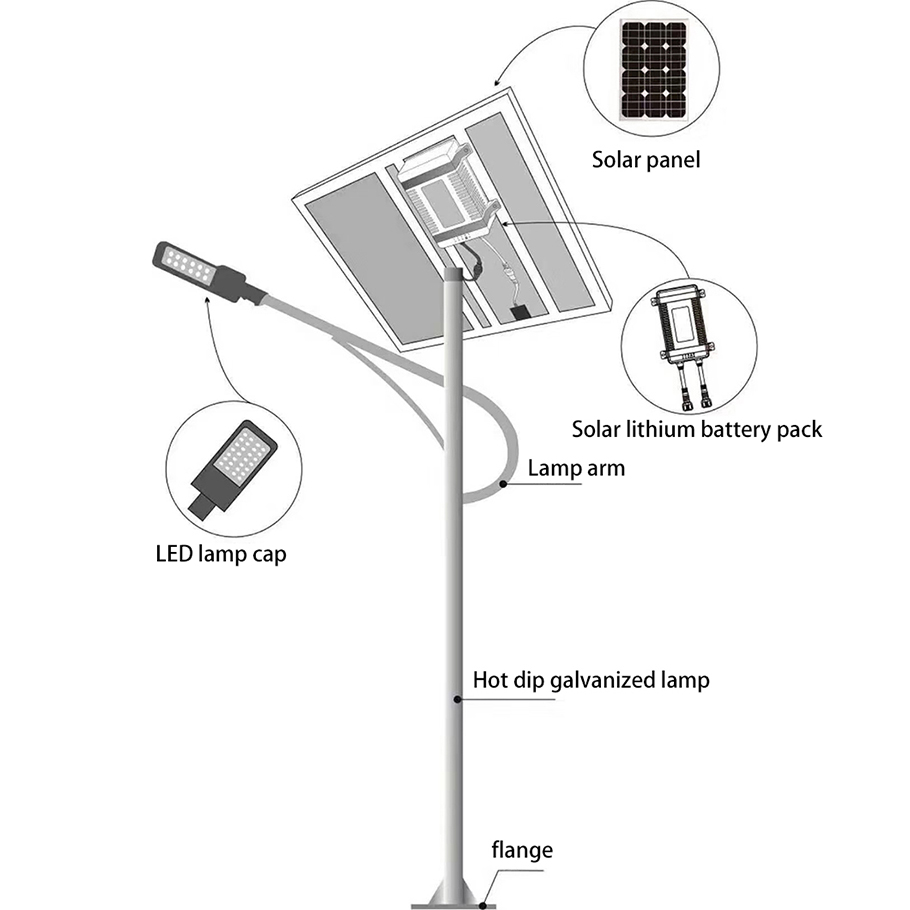
Solar street lighting system is composed of eight elements. That is, solar panel, solar battery, solar controller, main light source, battery box, main lamp cap, lamp pole and cable.
Solar street lighting system refers to a set of independent distributed power supply system constituting solar street lamps. It is not subject to geographical restrictions, is not affected by the location of power installation, and does not need to excavate the road surface for wiring and pipe laying construction. The on-site construction and installation are very convenient. It does not need power transmission and transformation system and does not consume municipal power. It is not only environmental protection and energy saving, but also has good comprehensive economic benefits. In particular, it is very convenient to add solar street lamps to the built roads. Especially in road lights, outdoor billboards and bus stops far away from the power grid, its economic benefits are more obvious. It is also an industrial product that China must popularize in the future.
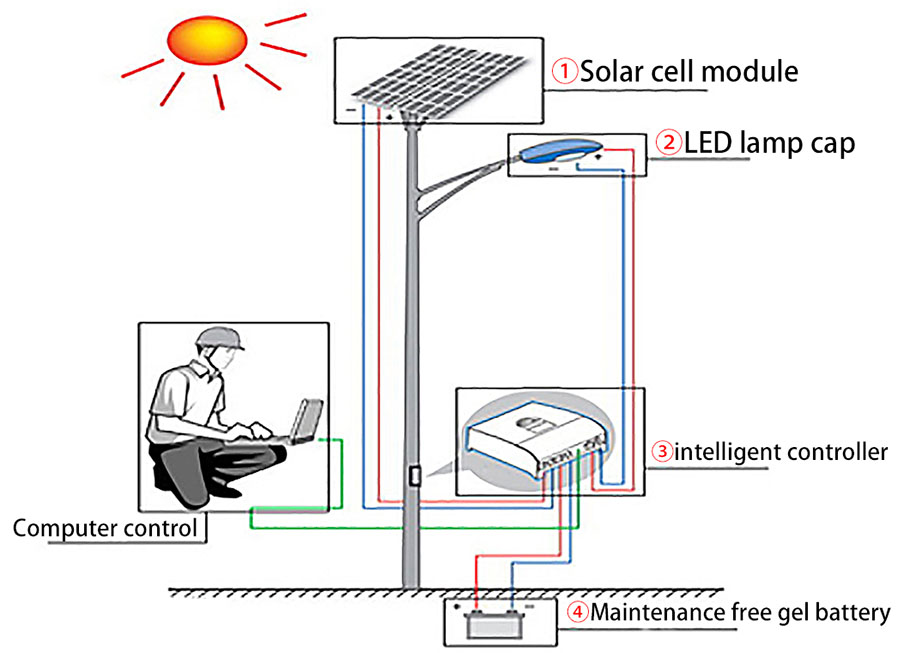
System working principle:
The working principle of the solar street lamp system is simple. It is a solar panel made by using the principle of photovoltaic effect. During the day, the solar panel receives solar radiation energy and converts it into electric energy, which is stored in the battery through the charge discharge controller. At night, when the illumination gradually decreases to the set value, the open circuit voltage of the sunflower solar panel is about 4.5V, After the charge discharge controller automatically detects this voltage value, it sends out the braking command, and the battery begins to discharge the lamp cap. After the battery is discharged for 8.5 hours, the charge discharge controller sends a braking command, and the battery discharge ends.
Installation steps of Solar Street Light system:
Foundation pouring:
1. Determine the position of standing lamp; According to the geological survey, if the surface 1m 2 is soft soil, the excavation depth should be deepened; At the same time, it shall be confirmed that there are no other facilities (such as cables, pipelines, etc.) below the excavation position, and there are no long-term shading objects on the top of the street lamp, otherwise the position shall be changed appropriately.
2. Reserve (excavate) 1m 3 pits meeting the standards at the position of vertical lamps; Carry out positioning and pouring of embedded parts. The embedded parts are placed in the middle of the square pit, one end of the PVC threading pipe is placed in the middle of the embedded parts, and the other end is placed in the storage place of the battery (as shown in Figure 1). Pay attention to keep the embedded parts and foundation on the same level as the original ground (or the top of the screw is on the same level as the original ground, depending on the needs of the site), and one side should be parallel to the road; In this way, it can be ensured that the lamp post is upright without deflection. Then, C20 concrete shall be poured and fixed. During the pouring process, the vibrating rod shall not be stopped to ensure the overall compactness and firmness.
3. After construction, the residual sludge on the positioning plate shall be cleaned in time, and the impurities on the bolts shall be cleaned with waste oil.
4. In the process of concrete solidification, watering and curing shall be carried out regularly; The chandelier can be installed only after the concrete is completely solidified (generally more than 72 hours).
Solar cell module installation:
1. Before connecting the output positive and negative poles of the solar panel to the controller, measures must be taken to avoid short circuit.
2. The solar cell module shall be firmly and reliably connected with the support.
3. The output line of the component shall be avoided from being exposed and fastened with a tie.
4. The orientation of the battery module shall face due south, subject to the direction of the compass.
Battery installation:
1. When the battery is placed in the control box, it must be handled with care to prevent damaging the control box.
2. The connecting wire between the batteries must be pressed on the terminal of the battery with bolts and copper gaskets to enhance the conductivity.
3. After the output line is connected to the battery, it is forbidden to short circuit in any case to avoid damaging the battery.
4. When the output line of the battery is connected with the controller in the electric pole, it must pass through the PVC threading pipe.
5. After the above, check the wiring at the controller end to prevent short circuit. Close the door of the control box after normal operation.
Lamp installation:
1. Fix the components of each part: fix the solar plate on the solar plate support, fix the lamp cap on the cantilever, then fix the support and cantilever to the main rod, and thread the connecting wire to the control box (battery box).
2. Before lifting the lamp pole, first check whether the fasteners at all parts are firm, whether the lamp cap is installed correctly and whether the light source works normally. Then check whether the simple debugging system works normally; Loosen the connecting wire of the sun plate on the controller, and the light source works; Connect the connecting line of the solar panel and turn off the light; At the same time, carefully observe the changes of each indicator on the controller; Only when everything is normal can it be lifted and installed.
3. Pay attention to safety precautions when lifting the main light pole; The screws are absolutely fastened. If there is a deviation in the sunrise angle of the component, the sunrise direction of the upper end needs to be adjusted to fully face due south.
4. Put the battery into the battery box and connect the connecting wire to the controller according to the technical requirements; Connect the battery first, then the load, and then the sun plate; During wiring operation, it must be noted that all wiring and the wiring terminals marked on the controller cannot be connected wrongly, and the positive and negative polarity cannot collide or be connected reversely; Otherwise, the controller will be damaged.
5. Whether the commissioning system works normally; Loosen the connecting wire of the sun plate on the controller, and the light is on; At the same time, connect the connecting line of the sun plate and turn off the light; Then carefully observe the changes of each indicator on the controller; If everything is normal, the control box can be sealed.
If the user installs lamps on the ground by himself, the precautions are as follows:
1. Solar street lamps use solar radiation as energy. Whether the sunlight on the photocell modules is sufficient directly affects the lighting effect of the lamps. Therefore, when selecting the installation position of the lamps, the solar cell modules can irradiate the sunlight at any time without leaves and other obstructions.
2. When threading, be sure not to clamp the conductor at the connection of the lamp pole. The connection of wires shall be firmly connected and wrapped with PVC tape.
3. When using, in order to ensure beautiful appearance and better solar radiation reception of the battery module, please clean the dust on the battery module every six months, but do not wash it with water from bottom to top.
Post time: May-10-2022


